|
|

|
|
Author
|
Topic: My latest model project (1/72 Space Shuttle Atlantis)
|
Jay Chladek
Member Posts: 2272
From: Bellevue, NE, USA
Registered: Aug 2007
|
 posted 10-04-2007 04:49 AM
   
I started work on this about four months ago and finished it on Sunday night. The model is now at the Strategic Air and Space Museum near Ashland, NE where it is going on display as part of an exhibit honoring Nebraska's first astronaut, Clayton Anderson. This model was built from the Monogram 1/72 Space Shuttle with Boosters kit. It should be in its display case as I type this. 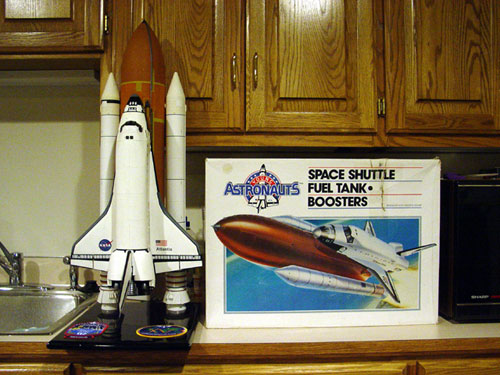 Out of the box, it builds into a pretty nice model and given that RTF tanks have no PAL or Bipod ramps, the modifications needed to accurize the model were not that many. The seams on the tank were a bit of a challenge, and my solution for that was to cover them with Krylon texture paint to simulate the rough texture lost during seam cleanup. It didn't match exactly, but it worked pretty well. 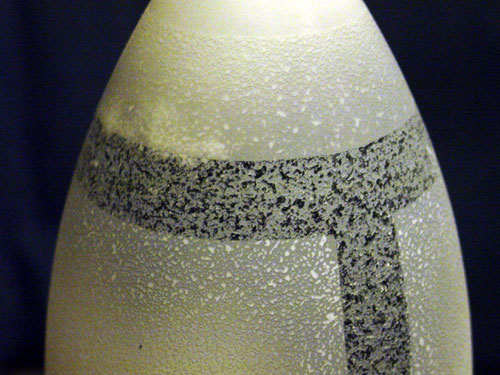 The orbiter has the most modifications, such as a drag chute housing at the base of the tail, LRSI tile patches at the base of the OMS pods, drilled out star tracker ports on the nose and strip styrene applied to the window frames to size down their slightly oversized appearance. I also added two astronaut pilot figures to the cockpit, so that there would be something to see when light hits them just right. 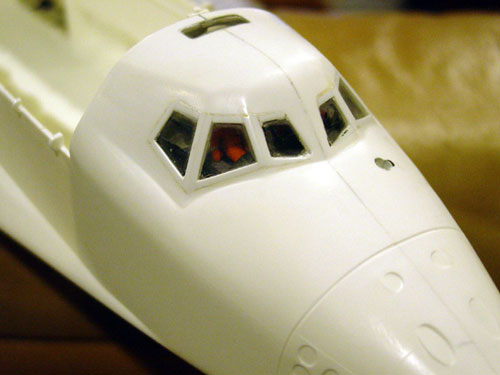 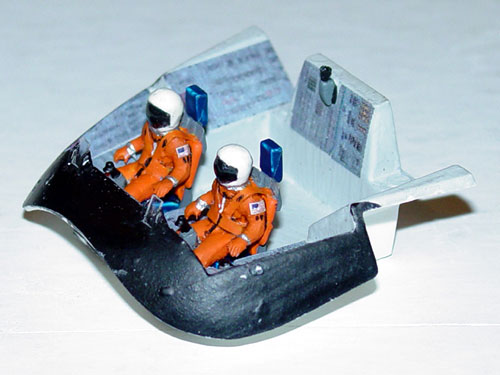 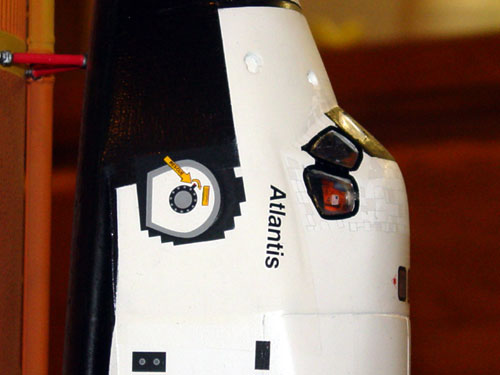 Tile work came from the Cutting Edge tile decal sheets and to darken the sides of the nose, I sprayed on a heavy mixture of Tamiya clear tints (smoke, red and blue) to get a nice gray black shade. Straight Tamiya smoke out of the bottle is too brown in color, hence the addition of red and blue to get it to a more dark grey/black shade. The best part is that the texture of the tile decals can still be seen on the model, even if the color variations can't. I did try to add some AFRSI blankets to the model with a thin weave fabric material I purchased called SIG Koverall. But I couldn't find a way to cut it properly and ran out of time. So I just used paint and some custom printed white decals to try and represent the AFRSI instead. It sort of worked, but the color variation of ALPS white is too close to that of the Tamiya white spray basecoat I used IMHO (Model Master white should work better since it is a tick darker). 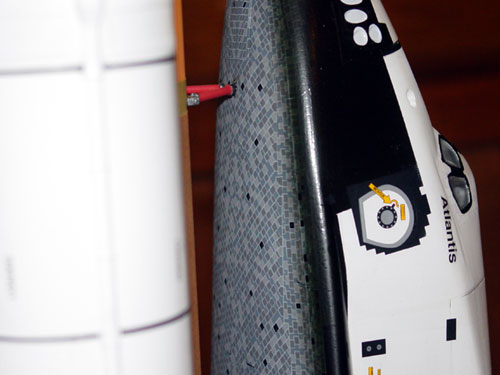 |
Jay Chladek
Member Posts: 2272
From: Bellevue, NE, USA
Registered: Aug 2007
|
 posted 10-04-2007 04:51 AM
   
Only thing I could probably have done at this stage would have been to weather some of the gray streaks around the RCS ports and the slightly off white FRSI patches on the wings. But I didn't want to risk another delay in getting this done if the weathering didn't go right, so I opted not to do it. As such, it might be a little cleaner then a real orbiter, but it should be fine for a museum display without looking too clean like a wood desktop model. Considering this was a rush job, I am happy with the results, warts and all.To get this model to fit on a stand with minimal support, I drilled two holes in the stand and mounted a pair of 3/16 music wire rods in it. Inside each booster is a brass tube that sleeves tightly over the rods and a set of stiffener rings to help keep the rods nice and straight in the boosters. The stack leans ever so slightly towards the orbiter, but otherwise it sits nice and straight and should for quite a while, given my use of extra slow cure epoxy for the construction. One other challenge was representing the patched hail damage spots on STS-117s External Tank. It was a tedious job putting on all the little dots and a couple of bigger patched areas. But it was worth it. Colors used for the ET were Floquil Model Railroad colors, specifically SP Daylight Orange (for the intertank region), UP Orange mixed with Freightcar brown (for the overall tank coloring) at about an 8 parts brown to 1 part orange ratio, and UP Armor Yellow for the sanded foam areas around the intertank and removed PAL ramps. My color matches seemed to work pretty well for this specific tank, based on pictures I downloaded from the NASA websites. 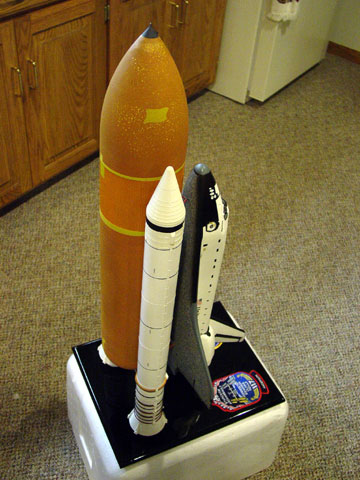 So there you have it. The display base has the official AB Emblems patches, ordered direct from their website. I must say, they mailed these out in a very timely fashion and look nice. This model will be on loan to the museum for the next two years. If you happen to be in the area, stop on by and check it out. The museum director saw it when I dropped it off on Monday and he was blown away by the amount of detailing I added to it. I just hope Clayton gets to see it when he comes to visit his home state after his flight. 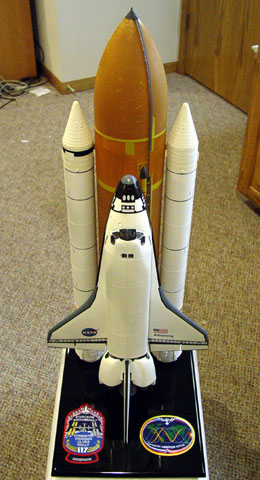 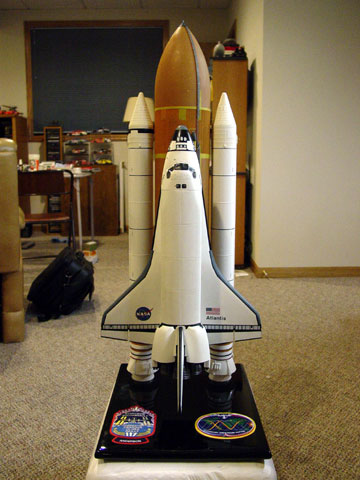 |
tegwilym
Member Posts: 2331
From: Sturgeon Bay, WI
Registered: Jan 2000
|
 posted 10-04-2007 11:09 AM
   
Amazing! You did a great job on making an ordinary model into something really special. Even better, the STS-117 flight was the one that I attended. That would be best displayed in my living room.  Tom
|
garymilgrom
Member Posts: 1966
From: Atlanta, GA
Registered: Feb 2007
|
 posted 10-04-2007 12:04 PM
   
Simply beautiful Jay! I especially like the crew inside and the hail damage on the ET. How about a shot with you in it to give us an idea of the scale?Edited by garymilgrom on October 04, 2007 at 12:07 PM. |
Mike Z
Member Posts: 451
From: Ellicott City, Maryland
Registered: Dec 2005
|
 posted 10-04-2007 12:46 PM
   
What an outstanding job Jay on this model!! There's nothing like an extremely well done model!! If I did this model as well, I would have to have it where I could see it all the time. It's very generous of you to lend it to the museum so the public can see it. Again Jay, you did a fantastic job!!Mike Z |
Robert Pearlman
Editor Posts: 42982
From: Houston, TX
Registered: Nov 1999
|
 posted 10-04-2007 01:33 PM
   
quote:
Originally posted by garymilgrom:
How about a shot with you in it to give us an idea of the scale?
The first of Jay's pictures, with the kitchen sink, should give a good idea of the model's size... |
Ben
Member Posts: 1896
From: Cape Canaveral, FL
Registered: May 2000
|
 posted 10-04-2007 01:43 PM
   
Nice model! I remember you said you were going to try the 117 tank. Wow, you did some job on that! |
Gilbert
Member Posts: 1328
From: Carrollton, GA USA
Registered: Jan 2003
|
 posted 10-04-2007 02:57 PM
   
Outstanding! |
Jay Chladek
Member Posts: 2272
From: Bellevue, NE, USA
Registered: Aug 2007
|
 posted 10-16-2007 09:55 PM
   
Well, on Monday my model finally went on display at the museum. The initial plans were to put the model in the same display case as the 1/100 Space Station model from NASA. But upon seeing the model, the currator decided to give my model its own lighted display case. As it was explained to me, this will give visitors a chance to take in a 360 degree view of the model, which they would not have been able to do if it had gone into the ISS display case.So now it is sitting near the observation gallery upstairs in the museum. As people pay to enter, this is among the first things they get to see when they enter the museum itself.     This arrangement will be temporary as apparently the plans are to give it a little better display area with some high resolution pictures of Atlantis STS-117 on the pad so people can appreciate the details on the model. I guess I knocked their socks off then with the work I did.  | |
Contact Us | The Source for Space History & Artifacts
Copyright 2020 collectSPACE.com All rights reserved.

Ultimate Bulletin Board 5.47a
|
|

|
 advertisement advertisement

|


