|
Author
|
Topic: Dragon Buck/Buzz Aldrin: 1/6 Lunar Module leg
|
GACspaceguy
Member Posts: 2474
From: Guyton, GA
Registered: Jan 2006
|
 posted 03-17-2006 07:32 PM
   
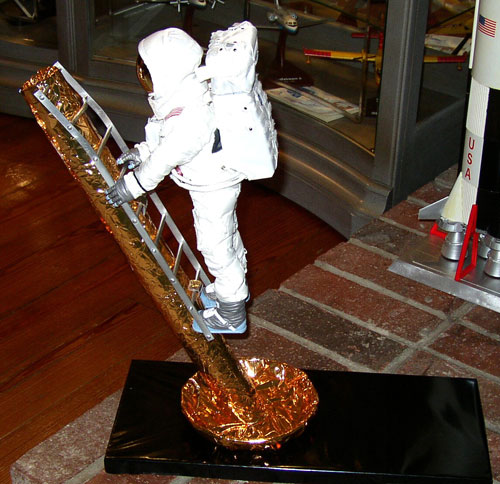
I thought you folks may like to see these photos. I purchased one of the Dragon Models' Buzz Aldrin 1/6 scale astronaut action figures. It is such a fine product I thought it needed a special display to show it. I could not think of a better way then to have him coming down the ladder on the LM leg (similar to the Revell model) in an accurate 1/6 scale as well. Well, here is the LM leg I built with the figure of Buzz descending.The leg is PVC pipe with a wooden dowel inserted into it to allow attachment to the base.The foot pad is a modified top to a Rubbermaid container. The ladder is all aluminum, with the tubing coming from the local hobbies shop (they use it for RC models). They Mylar came from one of those "space blankets". I do actually intend to complete the forward landing gear assembly (I have the plans on order from RealSpace models) including the front porch and adding the plaque on the leg of the LM. It will look like you took a slice of the front of the LM and have everything from the inboard edge of the porch forward. I have various shades of gold Mylar and plan on getting the colors close to the real deal.I would then like to have the other Dragon model called Buck and modify it with the EVA models decals to have the Neil Armstrong markings. With all of that complete I would set up the LM on a lunar landscape (about 2'x2') with Buzz coming down the ladder in one of the classical photo positions with Neil standing back taking the photo. Ambitious project, but doable, this was just my proof of concept start. 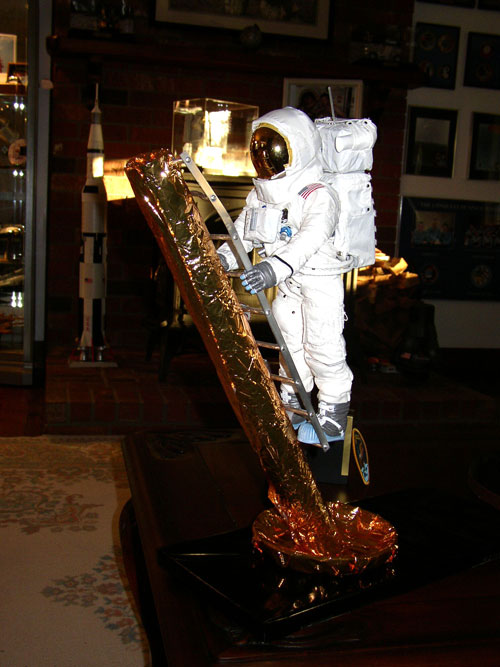 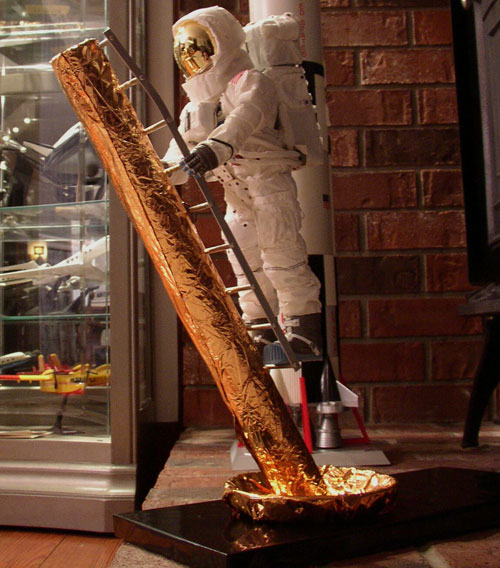
|
Moonpaws
Member Posts: 685
From: Lee's summit, MO
Registered: Jan 2005
|
posted 03-17-2006 10:59 PM
Bravo Fred! |
randy
Member Posts: 2176
From: West Jordan, Utah USA
Registered: Dec 1999
|
posted 03-18-2006 12:20 AM
Very nice! |
1202 Alarm
Member Posts: 436
From: Switzerland & France
Registered: Nov 2003
|
posted 03-18-2006 05:24 AM
Wow... really GREAT! How many hours were needed to do that? |
mensax
Member Posts: 861
From: Virginia
Registered: Apr 2002
|
posted 03-18-2006 06:40 AM
I'll take one! |
jeffbassett
Member Posts: 109
From: Toledo
Registered: Feb 2005
|
posted 03-18-2006 10:58 AM
Outstanding work! That really made a great product even better with the display you did, fantastic job! |
GACspaceguy
Member Posts: 2474
From: Guyton, GA
Registered: Jan 2006
|
posted 03-18-2006 08:16 PM
The time it took to do the physical work was about eight hours. The tough part was the ladder, the rest was rather simple. The descent stage of the LM does not require great finesse as you get to cover it with wrinkled Mylar. If you add in the hours of researching the size and shape of everything plus the time trying to figure out just what would work (I spent a couple of hours in the department store just trying to get something for the foot pad, turns out that it was here at home all along, while putting away dishes I realized that the 6" diameter Rubbermaid lid I was holding would work once it was timed then wrapped in Mylar). The ladder as I said was the hard part, it took about 5 hours to put together. I had some scrap 0.050" 2024-T3 aluminum (I thought I would add the actual material specs here in case someone would like to try and build this and has access to aerospace materials) sheared into 0.30" strips approx 13" long. I also obtained some discarded MS20470-3AD button head rivets that were about 0.50" long. I took the strips one at a time and clamped them in a vice and carefully bent them down to get the correct angle, I then strapped them together and drill them for the riser spacing. The ends of the strips were timed to the correct length. The aluminum strips and rivets have a protective alodine coating that is greenish gold color so that was removed with 0000 steel wool. I the glued the rivets into the strips (using brushed on crazy glue) so that the shank of the rivets protruded out and would act as the pin for the riser. The rivet had to be 3/32" diameter so that the head would produce the desired result (i.e. to look like the button head faster that is on the real thing). With the shank at 3/32 diameter and the tubing at 3/16" inside diameter I had a loose fit that obviously would not take glue. What I did next took the majority of the time. I cut 1/8" and 5/32" diameter tubing into short lengths. The 1/8" diameter tubing would fit over the rivet shank, the 5/32" diameter tube would fit over that and then the 3/16" step riser would fit snug, all of this glued together with the crazy glue. The thing that was tough was every time you cut this thin tubing it would leave a burr that had to be filed off each or else they would not slide over each other, it was very laborious. The second from the top riser had to be carefully bent to curve around the leg and the top riser just passed through a hole drilled it the leg. I fitted the hollow PVC pipe with a wooden dowel so that it would take screws easier. The base is a board wrapped like a Christmas package with black Mylar. Once the leg and pad were wrapped with Mylar I drilled for and then attached the leg to the pad with a screw through the base. The ladder is attached by the tube the top riser and a screw through the second from the bottom riser (that screw gets covered with a piece of silver Mylar so you can't see it). I am sure this is TMI but I am an engineer not a model maker and if I can do it maybe some of you folks can too (the strips you could make yourselves from an aluminum piece, and shiny chrome furniture nails could replace the rivets). Nothing ventured nothing gained! |
FutureAstronaut
Member Posts: 372
From:
Registered: Mar 2006
|
posted 03-19-2006 04:29 PM
Wow! Thats just amazing. Send a picture to Buzz and see if he'll sign it. |
Mike Z
Member Posts: 451
From: Ellicott City, Maryland
Registered: Dec 2005
|
posted 03-19-2006 11:01 PM
It looks like it belongs in a museum! What a great job! I have been to the National Air and Space Museum many times. It looks like the Apollo 11 Lunar Module Exhibition! It will really be interesting when you complete it! Best of luck with it! |
Gilbert
Member Posts: 1328
From: Carrollton, GA USA
Registered: Jan 2003
|
posted 03-20-2006 01:33 PM
That's also a pretty cool Saturn V model in the background. What's the story on it? |
GACspaceguy
Member Posts: 2474
From: Guyton, GA
Registered: Jan 2006
|
posted 03-20-2006 03:36 PM
Honestly the Saturn V is just a Revell model 1/96 scale, nothing earth shattering.
|
troyer500
New Member Posts:
From:
Registered:
|
posted 03-20-2006 06:28 PM
Very cool Fred!! |
Gilbert
Member Posts: 1328
From: Carrollton, GA USA
Registered: Jan 2003
|
posted 03-21-2006 08:54 AM
Fred, the model looked much bigger in the photo. |
Moonwalker1954
Member Posts: 245
From: Montreal, Canada
Registered: Jul 2004
|
posted 03-21-2006 11:40 AM
I have both Buck and Buzz astronaut figures but unfortunately don't have either your expertise or ability to do this. It's a wonderful display that you have! Congrats.Please show us some pics when it will be completed. |
tegwilym
Member Posts: 2331
From: Sturgeon Bay, WI
Registered: Jan 2000
|
posted 03-22-2006 10:59 AM
Very nice! That almost gets me motivated to try something a little more creative with my displays. |
Bill Hunt
Member Posts: 399
From: Irvine, CA
Registered: Oct 2002
|
posted 04-14-2006 02:53 PM
Boy, that's an outstanding piece of work! Well done. |
cddfspace
Member Posts: 609
From: Morris County, NJ, USA
Registered: Jan 2006
|
posted 04-18-2006 09:02 AM
Great job! I wish I had the ability to pull something like that off... |
ilbasso
Member Posts: 1522
From: Greensboro, NC USA
Registered: Feb 2006
|
posted 04-23-2006 09:34 PM
Fabricating the ladder out of metal would definitely be out of my league. Any thoughts on what would be a reasonable substitute for the aircraft aluminum you used in the ladder? Maybe plastic that was painted with aluminum color?Or maybe one could put together a diorama based on this scene - LM leg without the ladder... but then you'd have to come up with the lunar surface.
 |
GACspaceguy
Member Posts: 2474
From: Guyton, GA
Registered: Jan 2006
|
posted 04-24-2006 11:09 AM
I would think that a plastic of 0.060 or better should be OK. You would need to cut in the shape that cants over at the two top rungs. The tubing is easily obtainable at a hobby shop. |
nasamad
Member Posts: 2121
From: Essex, UK
Registered: Jul 2001
|
posted 04-24-2006 01:14 PM
I'm still gathering photo's and plans to build a 1/6 scale ascent stage section for my Dragon "Buck". I plan just to build the forward section containing the controls.It's when you see the size of one LM leg that you realize how big a 1/6 scale LM would be! Just the whole ascent stage would be something like 700mm wide! And and entire LM would be getting on for 1.5 metres wide! |
ilbasso
Member Posts: 1522
From: Greensboro, NC USA
Registered: Feb 2006
|
posted 04-24-2006 03:50 PM
Wow, I would KILL for a scale LM interior like that. I'd probably try to jump in there with Buzz. |
spacewalker65
New Member Posts:
From:
Registered:
|
posted 05-02-2006 05:28 PM
You have created a masterpiece. I really admire your work. |


