|
Author
|
Topic: Atomic City 1:12 Mercury spacecraft model kit
|
dsenechal
Member Posts: 539
From:
Registered: Dec 2002
|
 posted 11-30-2004 03:49 PM
   
I just got the long-awaited 1/12 scale (!) Mercury spacecraft from Atomic City. WOW! This has got to be the best space kit ever! Well worth the wait.Fully assembled, including the launch escape system, it stands more than 2 feet in height. The kit is made of injection-molded plastic, and is being distributed by MRC. Detail and quality are absolutely superb. While we may occasionally wax nostalgic over the old Revell and Monogram kits of the 1960s, this is further evidence that the present is truly the "golden age" of space modeling. |
John K. Rochester
Member Posts: 1292
From: Rochester, NY, USA
Registered: Mar 2002
|
 posted 12-15-2004 07:54 AM
   
What a terrific kit! Well worth the cost. You can't imagine how great it is until you actually have it in your hands. Extremely well detailed. All I need to do now is research colors to get everything correct. |
Randy Wise
New Member Posts: 2
From: Abbotsford, B.C., Canada
Registered: Sep 2004
|
 posted 12-16-2004 11:21 PM
   
Got my Mercury last week. Most of the large assemblies are together. The detail is exquisite and the fit is primo. The crew cabin cries out for extra detailing so as to match it to the exterior. Thank goodness for "Life In Space" and SIM. |
John McGauley
Member Posts: 151
From: Fort Wayne, Indiana USA
Registered: May 2001
|
 posted 12-16-2004 11:43 PM
   
I've found some OK references for colors and exterior detailing. What does everyone else use for this? Any good resources, photo collections, etc. out there? |
John K. Rochester
Member Posts: 1292
From: Rochester, NY, USA
Registered: Mar 2002
|
 posted 12-23-2004 02:51 PM
   
...so far the only thing I don't like is the astronaut figure not being plastic so regular model paints do not dry very well. |
dsenechal
Member Posts: 539
From:
Registered: Dec 2002
|
 posted 12-24-2004 05:37 PM
   
quote:
Originally posted by John K. Rochester:
so regular model paints do not dry very well.
Try using Krylon Fusion paint (spray can from WalMart, etc.) as a primer and then use normal acrylic model paint over that. Since this paint is intended to stick to plastic (or vinyl) it should work. No promises, mind you, but it's worth a try. At least, that's what I'm planning when I paint mine. Good luck. Dave |
Yankee64
Member Posts: 10
From: Seattle Washington USA
Registered: Jan 2005
|
 posted 01-05-2005 12:43 AM
   
If you have not yet seen it, this kit is awesome! Here is a very good kit review on the new 1/12th Mercury capsule. I can't wait to blast off with this project! I'm going for the works! New custom interior, lights, custom control panel, etc! Friendship 7 of course... I can't help it! |
divemaster
Member Posts: 1376
From: ridgefield, ct
Registered: May 2002
|
 posted 01-05-2005 12:12 PM
   
The instructions give the details for Sigma 7. Wally Schirra and I had a talk about the model and he reminded me (rather strongly) that he did NOT wear the mirror (hero's medal) as depicted on the figure.
Mike Mackowski's Space in Miniature series of books has an excellent Mercury reference book for those that want to go crazy with detail. And I have my two models. One on which to make my mistakes and one to display! Now, where can I find a 1/12 Atlas?  |
Yankee64
Member Posts: 10
From: Seattle Washington USA
Registered: Jan 2005
|
 posted 01-05-2005 08:49 PM
   
Does the Mercury book have good photos of Friendship 7? |
divemaster
Member Posts: 1376
From: ridgefield, ct
Registered: May 2002
|
 posted 01-06-2005 09:43 AM
   
There are better photos of Friendship 7 online. However, Mike's books will give you all the details you'll ever need. All photos in his books are black and white and of medium quality. Great reading, though. |
Yankee64
Member Posts: 10
From: Seattle Washington USA
Registered: Jan 2005
|
 posted 01-06-2005 01:16 PM
   
I am more interested in the interior layout for Friendship 7. I don't think that the 1/12th kit has the right 'couch' and rear details correct? And I'm interested in seeing where the interior cabin lamps and wire harnesses are. I'm not going to have Glenn inside this project so I will also be building the hand controls as well.Sounds like Mike's book is still a go! |
ejectr
Member Posts: 1751
From: Killingly, CT
Registered: Mar 2002
|
 posted 02-10-2005 10:10 PM
   
Why is the hatch red? I never remembered seeing a red hatch on any Mercury spacecraft.Wasn't it black like the rest of it with the words "United States" in white written on it? |
John K. Rochester
Member Posts: 1292
From: Rochester, NY, USA
Registered: Mar 2002
|
 posted 02-11-2005 11:14 AM
   
I guess they figured we would all be painting the craft anyways so why not mold the hatch in red. |
ejectr
Member Posts: 1751
From: Killingly, CT
Registered: Mar 2002
|
 posted 03-05-2005 06:38 PM
   
Did anyone else notice that the picture on the box cover edge that depicts Scott Carpenter in Aurora 7 is actually Wally Schirra getting out of Sigma 7 on the carrier elevator? |
RocketmanRob
Member Posts: 268
From: New York City USA
Registered: Mar 2005
|
 posted 11-27-2005 08:06 PM
   
I'm in the process of putting together Atomic's Mercury capsule model in a Friendship 7 configuration. Does anyone have some experience with matching the paint for the heat shield? Instructions and photos show an earthly/chocolate matte brown with a silver retro pack. Any suggestions on what color to use to match the brown or what color mixtures might be used? |
dtemple
Member Posts: 729
From: Longview, Texas, USA
Registered: Apr 2000
|
 posted 12-02-2005 07:49 PM
   
Color photos of the MA-10 "Freedom 7 II" (spacecraft 15B) heatshield is what some modelers use as a reference. However, I read that the mottled appearance of this heatshield is likely due to age and in fact the color was originally much darker. Unless someone can suggest better, the only way to approximate the actual color of the Mercury spacecraft heatshield is to use a mix of copper and tan. My source is the book by Mike Mackowski titled "Space In Miniature #5 - Mercury." Also, according to this book the retro pack was flat white — at least on the "Freedom 7 II" spacecraft; the last part of the book details the construction of Collectair's 1/32nd scale Mercury spacecraft in the MA-10 configuration. Color photos of the actual spacecraft can be seen at this website. |
ea757grrl
Member Posts: 729
From: South Carolina
Registered: Jul 2006
|
 posted 07-20-2006 06:19 AM
   
Here's a couple of previews: For my own part, I consider it a very nice, impressive kit. If I remember correctly, most of the criticisms about it have centered around the somewhat simplified interior (particularly the instrument panel, and that it represents one particular spacecraft while there were variations among the Mercury instrument panels) and the hard-rubber astronaut figure with the control stick handle molded into his hands. Depending on how much you wanted to do, you could really have a lot of fun wiring, painting and detailing the interior.As far as the exterior goes, it looks very good. Some kits have a blemish on the cabin window piece (mine does too, but it's tiny and I can barely see it). It has some very nice decals complete with the striping for the retropack, and logo decals for all six operational spacecraft, though there's no crack for Liberty Bell 7. The instruction sheet also includes conversion instructions for modifying it into Freedom 7. The thing is tall when you get it built. The spacecraft itself is a nice size, but when you add the retropack and the escape tower, it becomes an attention-getter. While for the price I wish the kit had more interior detail than it does, on the whole it's a pretty neat kit. If you can find one at a good price, get it and have some fun with it. |
divemaster
Member Posts: 1376
From: ridgefield, ct
Registered: May 2002
|
 posted 07-21-2006 10:21 AM
   
It's also fairly easy to do a build up of the interior if you're so inclined.The Mercury version of the book Spacecraft in Miniature will be a great help - as will David Weeks' 1:12 scale drawings that are available at realspacemodels.com It's a fun build right out of the box, too. |
jeffbassett
Member Posts: 109
From: Toledo
Registered: Feb 2005
|
 posted 07-22-2006 07:04 AM
   
Here is a website showing a build up right from the box.With a little patience building, looks darn good to me. |
ea757grrl
Member Posts: 729
From: South Carolina
Registered: Jul 2006
|
 posted 07-22-2006 07:16 AM
   
I forgot to mention, Rick Sternbach at Space Model Systems does an updated decal sheet for the kit. It includes a separately-printed crack for Liberty Bell 7.Look for set MC12. If I recall correctly, Rick did the decals for the kit, but the aftermarket set includes some stuff that wasn't on the kit set. It's there if you're interested; I'll probably just make do with the kit's decal set myself. |
AussiePete
Member Posts: 104
From: Adelaide, South Australia
Registered: Jan 2014
|
 posted 01-22-2015 09:02 PM
   
Anyone build this lately? Looking for more detailed images of the interior. Thanks. |
apolloprojeckt
Member Posts: 1447
From: Arnhem, Netherlands
Registered: Feb 2009
|
 posted 01-23-2015 04:45 AM
   
Real hardware of build process, here some from me. |
AussiePete
Member Posts: 104
From: Adelaide, South Australia
Registered: Jan 2014
|
 posted 01-24-2015 04:31 PM
   
Thanks Pascal. That looks awesome. |
AussiePete
Member Posts: 104
From: Adelaide, South Australia
Registered: Jan 2014
|
 posted 03-15-2015 06:49 AM
   
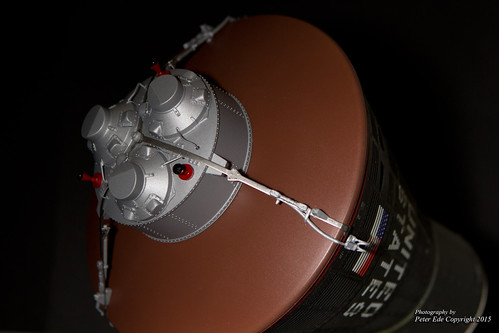
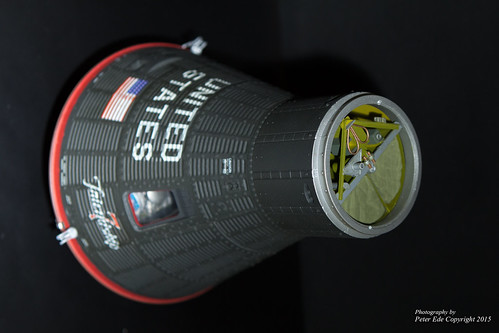
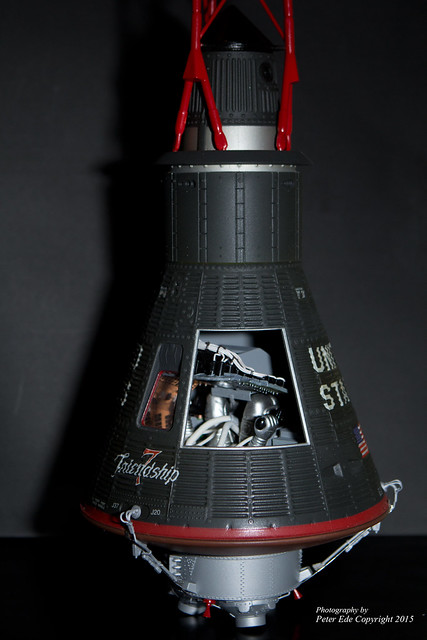
Finished my 1/12 Mercury. Not as detailed as some but I added some. 


|
apolloprojeckt
Member Posts: 1447
From: Arnhem, Netherlands
Registered: Feb 2009
|
 posted 03-15-2015 07:00 AM
   
Looks great!! |
GACspaceguy
Member Posts: 2474
From: Guyton, GA
Registered: Jan 2006
|
 posted 03-15-2015 04:33 PM
   
Wonderful! |
ejectr
Member Posts: 1751
From: Killingly, CT
Registered: Mar 2002
|
 posted 03-15-2015 06:30 PM
   
Superb job! |
Panther494
Member Posts: 402
From: London UK
Registered: Jan 2013
|
 posted 03-15-2015 07:13 PM
   
Lovely job of a great kit, really looks neat and clean. Superb. |
AussiePete
Member Posts: 104
From: Adelaide, South Australia
Registered: Jan 2014
|
 posted 03-16-2015 01:12 AM
   
Thanks guys.A little more detailing internal and I'll post up a few more pics. |
GACspaceguy
Member Posts: 2474
From: Guyton, GA
Registered: Jan 2006
|
 posted 03-16-2015 08:04 AM
   
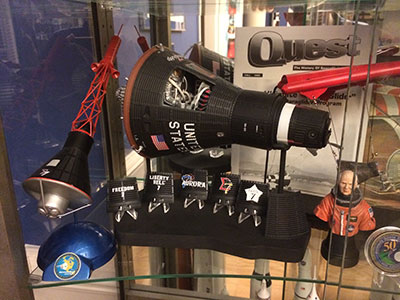
We finally figured out what to do with the leftover decals from the Atomic City 1/12 Mercury after using the "Friendship 7". We had Michael Key make us a panel five times and used those for the canvas. |
AussiePete
Member Posts: 104
From: Adelaide, South Australia
Registered: Jan 2014
|
 posted 03-16-2015 03:51 PM
   
That's a great idea. Looks a bit more detailing than my attempt. |
keymichael1855
Member Posts: 176
From: Virginia Beach, VA, USA
Registered: Feb 2012
|
 posted 03-16-2015 07:57 PM
   
Looks great Fred! I'm glad that the panels came out nice, and that the decals from the other missions aren't wasted. Looks like you found the perfect little stands to display them as well- a great overall display! |
AussiePete
Member Posts: 104
From: Adelaide, South Australia
Registered: Jan 2014
|
 posted 03-17-2015 12:36 AM
   
These 1/12 panels are not on your Shapeways page Michael. How can we get some? |
keymichael1855
Member Posts: 176
From: Virginia Beach, VA, USA
Registered: Feb 2012
|
 posted 03-17-2015 03:06 PM
   
Here ya go Peter! |
kosmo
Member Posts: 388
From:
Registered: Sep 2001
|
 posted 06-03-2015 07:45 PM
  
Where do you find info to model the wiring on the back of the main control panel? |
AussiePete
Member Posts: 104
From: Adelaide, South Australia
Registered: Jan 2014
|
 posted 06-04-2015 06:27 AM
   
As an avionics/instrument fitter I just used my own ideas. |
kosmo
Member Posts: 388
From:
Registered: Sep 2001
|
 posted 06-05-2015 06:48 AM
  
Do you have any detail photos of the back of your Mercury control panel that you would be willing to share? |
mercsim
Member Posts: 219
From: Phoenix, AZ
Registered: Feb 2007
|
 posted 06-05-2015 09:42 AM
   
Put your email in your profile or send me one and I'll send you some photos behind the actual panels to build your model. |


